
Do you see that the MS Product have a point for it's IDE and it's ease of use to build GUI in short time ?!
Do you want to make awesome program GUI in less than 10 Minutes ?!!
Yeah, you can do more than that.We will know how to Integrate SwingX(Coolest UI API, I used) in NetBeans IDE(The only IDE you need), So let's dance.
Contents :
- What is SwingX?
- Downloading SwingX Library.
- Adding SwingX Library to NetBeans IDE.
- Adding SwingX Library to your Project.
- Integrating SwingX with NetBeans IDE (To use drag and drop).
Contains extensions to the Swing GUI toolkit, including new and enhanced components that provide functionality commonly required by rich client applications. Highlights include:
- Sorting, filtering, highlighting for tables, trees, and lists
- Find/search
- Auto-completion
- Login/authentication framework
- TreeTable component
- Collapsible panel component
- Date picker component
- Tip-of-the-Day component
Demos:
- JXTaskPane

- JXTipOfTheDay
- JXBusyLabel
Downloading SwingX Lib:
You can download it from SwingLabs Downloads Page.

Adding SwingX Library to NetBeans IDE:
From Tools > Libraries, Choose New Library.

Write the Lib Name and press OK.

Click Add Jar/Folder.

Go To the Downloading Dir and After extracting the Lib and choose the SwingX Jar and SwingX-BeanInfo Jar and press Add JAR/Folder.

If you want you may add the Source Code and the Java Doc.
I will add the JavaDoc to benefit from the Awesome Code Completion NetBeans IDE Feature, So if you will, add the JavaDoc press JavaDoc tab and click Add ZIP/Folder.

Choose the doc dir and press Add ZIP/Folder.

Click Ok to Finish Creating the SwingX Library.

Adding SwingX Library to your Project :
Now we will add the SwingX Library to our project and you must make this step every time you create a project that will uses SwingX.
Right Click on Libraries and choose Add Liberary.

Select SwingX from Add Library window and click Add Library.


Congrats you added the lib and now can use it's components.
Integrating SwingX with NetBeans IDE (To use drag and drop)
From Tools > Palette > Swing/AWT Components, press on New Category.

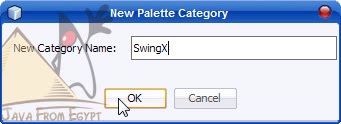
Write the Category Name and press OK.

Select the category we created and then click Add from Library.

Choose SwingX lib and click Next.


Select All by pressing “Ctrl + A” and Press Next (You may choose some beans only, It' s up to you).

Choose SwingX Category and press Finish.


Congratulations, We made it. Thanks everybody for your time and hope that was useful, If you have any question please contact us or hit the comment button and we all here for you.

1 comments: on "How to Make Awesome Program Interface in less than 10 Minutes by Integrating SwingX in NetBeans IDE"
thanx islam for this topic
i love swingX too much
keep on keep forward
Post a Comment