TvQuran
Latest Posts

Saturday, April 7, 2012

The Way To Android : Lesson 3


The Way To Android : Lesson 3
-----------------------------
  • Agenda :
1 - Create your first android application
2 - Run your android application on simulator 
3 -  Examining your android project 

1 - Create your first android application
------------------------------------------------------
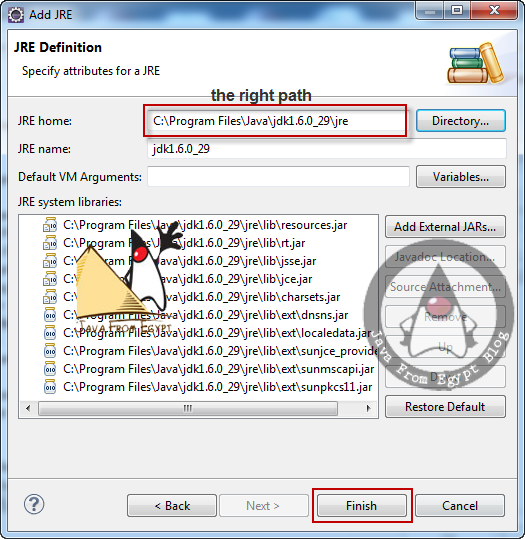
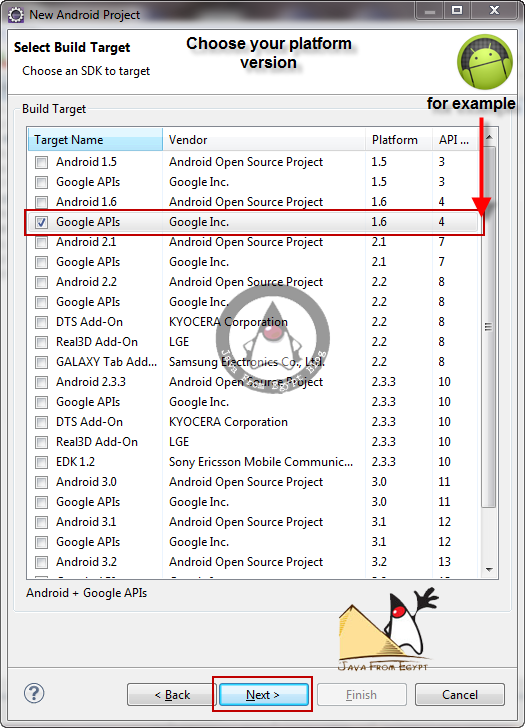
  1. open your eclipse ( with ADT plugin installed and SDK integrated )
  2. from file menu choose --> new project 


2 - Run Your android application 
------------------------------------------------------

  1. Right click on your android project 
  2. choose run as --> android application 
  3. after run your project 


3 - Examining your android project
------------------------------------------------------
when you create a new android application . you get some several items in the project root directory , including the following : 

  1. AndroidManifest.xml: An XML file that describes the application being built and what     components (activities, services, etc.) are being supplied by that application

  2. bin/:
    The directory that holds the application once it is compiled
  3. libs/:
    The directory that holds any third-party JARs your application requires
  4. res/:
    The directory that holds resources, such as icons, GUI layouts, and the like, that are packaged with the compiled Java in the application.
  5. src/:
    The directory that holds the Java source code for the application.


----------------------------------------------------------------------------------------------------

In addition to the preceding file and directories, you may find any of the following in Android projects :


  1. assets/: 
    The directory that holds other static files that you want packaged with the   application for deployment onto the device.
  2. gen/: 
    The directory in which Android’s build tools place source code that they generate
  3. build.xml and *.properties: 
    Files that are used as part of the Ant based command-line build process, if you are not using Eclipse
  4. proguard.cfg
    A file that is used for integration with ProGuard to obfuscate your Android code
----------------------------------------------------------------------------------------------------------------------------


The REST of Story 
--------------------------
Now we will explain some subdirectories you will  find under -----> res/:


  1. res/drawable/: For images (PNG, JPEG, etc.)
  2. res/layout/: For XML-based UI layout specifications
  3. res/menu/: For XML-based menu specifications
  4. res/raw/:
     
    For general-purpose files (e.g., an audio clip or a CSV file of account information)
  5. res/value/: For strings, dimensions, and the like
  6. res/xml/: For other general-purpose XML files you wish to ship

-----------------------------------------------------------------------------------------

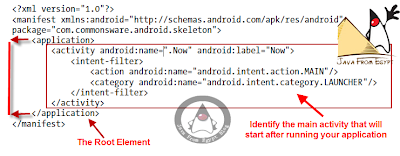
One of the most important file in your application is the manifest file : It
 contain the basic info about your  application 


The element supplies :

  1. android:name for the class implementing the activity
  2. android:label for the display name of the activity
  3. <intent-filter> :
    child
    element describing under what conditions this activity will be displayed
  4. element sets up your activity to appear in the launcher, so users can choose to run it. As you’ll see later in this book, you can have several activities in one project, if you so choose.


Now we know how to create our first project and what is the project structure  


To Be Continued

read more...

Saturday, March 24, 2012

The Way To Android : Lesson 2


The Way To Android : Lesson 2
-----------------------------
  • Agenda :
1 - Install the editor (eclipse)
2 - Install the ADT( android development tool) plugin for eclipse
3 - Install Android SDK
4 - Setup Simulator 
Install The Editor ( eclipse )
from this link choose your Download Eclipse  you want to use .

Install The ADT for eclipse
1 -open your eclipse
2 - from help menu
3 - choose install new software 
4 - in the field of work with --> write this url 
                                 http://developer.android.com/sdk/eclipse-adt.html 
5 - press enter


Install The Android SDK

1 -go to 
                  http://developer.android.com/sdk/index.html 
2 - from help menu
3 - choose install new software 


Setup Simulator 

1 - to setup simulator you must : integrate eclipse with ADT And SDK you downloaded before 
2 - open your eclipse ( with ADT installed )
3 - from window menu --> choose preferences 


To Update your sdk version
  •           from window menu --> choose " Android  SDK  Manager "
  •           you will find a list of all available android platform 
  •           choose what you want to install 

After Update your sdk version 
  •         you can setup your simulator 
  •           from window menu --> choose AVD Manager ( Android Virtual Device 


To Start Simulator 
  •           After Creating AVD
  •            from window menu choose AVD Manager to start your emulator 


After press start you will see the following menu 
adjust your resolution if you want to resize your emulator 


After press launch button your android emulator will start and you can begin to develop your first android application :)) .


To Be Continued

read more...

Tuesday, March 20, 2012

The Way To Android : Lesson 1

The Way To Android : Lesson 1
-----------------------------

  • Agenda :
1 - Introduction
2 - Platform
3 - Software development
Introduction
  • What is Android ?
1 - A software platform and operating system for mobile devices

2 - Based on the Linux kernel

3 - Developed by Google and later the Open Handset Alliance 
       (OHA)

4 - Allows writing managed code in the Java language

5 - Possibility to write applications in other languages and 
      compiling  it to ARM native code (support of Google? No)

6 - Unveiling of the Android platform was announced 
                              on 5 November   2007  with the founding of OHA
  • What is the Open Handset Alliance (OHA) ? 
                 1 -  It's a consortium of several companies


                 2 -  Devoted to advanced open standards for mobile devices


                 3 -  Develop technologies that will significantly lower the cost of  
                        developing and distributing mobile devices and services


  • Android License
                 1 -  Android is under version 2 of The Apache Software License.
                         http://www.apache.org/licenses/LICENSE-2.0.html 


Platform
  • Hardware
 Android is not a single piece of hardware; it's a complete, end-to-end 
 software platform that can be adapted to work on any number of 
 hardware configurations. Everything is there, from the boot loader 
all the way up to the applications.


  • Operating System
  • Android uses Linux for its device drivers, memory management, process management, and networking.
  • The next level up contains the Android native libraries. They are all written in C/C++ internally, but you’ll be calling them through Java interfaces. In this layer you can find the Surface Manager, 2D and 3D graphics, Media codecs, the SQL database (SQLite), and a native web browser engine (WebKit).
  • Dalvik Virtual Machine. Dalvik runs dex files, which are coverted at compile time from standard class and jar files. 

  • Network Connectivity
  • its support wireless communication using :
  • GSM mobile-phone technology
  • 3G
  • 802.11 Wi-Fi network


  • Security
  • Android is a multi-process system, in which each application (and parts of the system) runs in its own process. Most security between applications and the system is enforced at the process level through standard Linux facilities, such as user and group IDs that are assigned to applications. 
  • Additional finer-grained security features are provided through a "permission" mechanism that enforces restrictions on the specific operations that a particular process can perform, and per-URI permissions for granting ad-hoc access to specific pieces of data.
Android Hierarchy 

Software Development


  • Development requirements
  • Java
  • Android SDK
  • Eclipse IDE


To Be Continued


read more...

Monday, January 9, 2012

Google App Engine : Using the Data store


Lesson 4 : Using the Data store
In our previous lessons we learned:

Today we will learn how to store data on the AppEngine Server to list it at any time. 
Lessons Outlines:-
  1. Introduction
  2. Types of Data Store
  3. Component of Data Store
  4. Complete our previous application
  5. Test your application.
1 – Introduction
 In General ,  
  • Storing data in a scalable web application can be tricky.
  • A user could be interacting with any of dozens of web servers at a given time
  • and the user’s next request could go to a different web server than the one that handled the previous request

With Google App Engine , 
  • You don’t have to worry about any of that App Engine’s infrastructure takes care of all of the distribution , replication and load balancing of data behind a simple API
  • You get a powerful query engine and transactions as well.
2 - Types of Data Store
1-      High Replication datastore ( HRD )

a.       The default datastore for an application

b.      Data is replicated across multiple data centers using a system based on the Paxos algorithm.

c.       This provides the highest level of availability for reads and writes, at the cost of higher latency on writes due to the propagation of data.

2-      Master/Slave Data Store

a.        Designates one data center to hold the master copy of all data.

b.      Data written to the master data center is replicated asynchronously to all other (slave) data centers.

c.       Since only one data center is the master for writing at any given time, this option offers strong consistency for all reads and queries, at the cost of periods of temporary unavailability during data center issues or planned downtime.

3 - Component of Data Store

1-      The datastore writes data in objects known as entities.

2-      Each entity has a key that identifies the entity.

3-      Entities can belong to the same entity group, which allows you to perform a single transaction with multiple entities.

4-      Entity groups have a parent key that identifies the entire entity group.

4 - Complete our previous application

now will update our previous application posted in my post First Application to include data store.
follow next steps :


1 - Update Servlet Class to Save our Entity 


2 - Update JSP Page to list all Stored Object


5 - Test your application


As we mentioned before.to run your applications write (http://localhost:8888/) in your browser to be able to test it.

And now we need to know where the entities are stored?
The answer is: check this URL (http://localhost:8888/_ah/admin) you will find your entities and data stored in it.

Now we have finished our lesson today.

  To download the source code


Thanks


read more...

Saturday, December 24, 2011

Google App Engine : Your First Application

Lesson #3 Outlines
  1. Choosing Framework ( if you want )
  2. Authenticating Users
  3. Develop First Application 
1 - Choosing Framework ( if you want )

  • Choosing the best application framework almost always generates a heated debate.
  • There are pros and cons for each framework, and every developer has an opinion.
  • To ensure that your application will run within the App Engine server runtime environment, App Engine imposes some constraints that enable applications to run “nicely” together and be scalable across multiple distributed runtime instances.
  • While Google doesn't officially support the libraries or frameworks that run on App Engine, it does take a community-oriented approach to compatibility.
  • Popular Java libraries and frameworks are listed in the next Table 


2 - Authenticating Users 

  •     Nearly every web application nowadays requires user authentication.

  •     You’ll build out your authentication framework to let users enter and view timecard entries—naturally, only for themselves.

  •     Authentication with App Engine comes in two flavors. You can choose to plug into Google’s Accounts service (Users service), or you can roll your own with custom classes, tables, and memcache.
    User Services :


3 - Develop First Application

    1 – Create New web Application Project


    2 – Application Directories


    3 – Using User Authentication (Servlet Class)


    4 – View (Using JSP)


    5 - Update web.xml to ( include servlet class , jsp file , and chnage your welcome file )


    6 - Run Application As a web application (http://localhost:8888 )


    7 - Deploy the Application To upload your application click on this icon


   .... ( note ) .... : if you face any problem after creating your jsp file follow the next steps :

from window menu ---> choose preferences ---> select java ----> select installed JRE


we have Finished our lesson today ........ in the next lesson we will know how to store the greeting to be able to display all of them


To Be Continue
Thanks

    To download the source code
read more...