Well, We will learn how to add MySQL library and Hibernate library to NetBeans IDE, and how to make small application to connect Hibernate to MySQL, So stay with us.
Contents:
- Add MySQL library to NetBeans IDE.
- Add Hibernate library to NetBeans IDE.
- Use MySQL Server to make small table.
- Make the first Hibernate application and connect it to MySQL Server.
- Download Source Code.
1- Add MySQL library to NetBeans IDE.
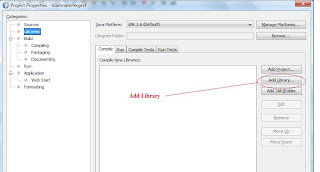
- Right-click on project name choose properties
- Click on library

- Add library
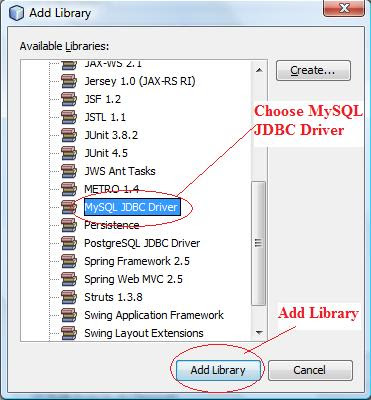
- Choose MySQL
- Add the library
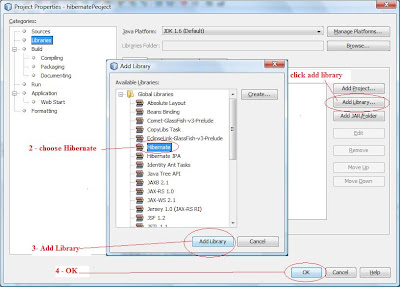
2- Add Hibernate library to NetBeans IDE.
3- Use MySQL Server to make small table
- Download mysql from ( http://dev.mysql.com/downloads/mysql/5.1.html#win32 )
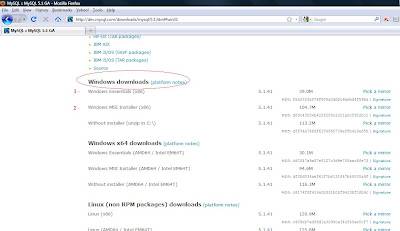
- Install these two file the very important step
1- setting the password ( if you have loder version and removed it you will see current root password , if not you will not see it )(hint : we use password -- 12345)
2- Ensure that mysql server installed correctly (otherwise you must reinstall mysql)
4- Make the first Hibernate application and connect it to MySQL Server.
1. Make java application
2. Add mysql liberary and hibernate library
3. Build our database
Table name student (use default schema test)
Name | Age |
Ahmed | 21 |
Islam | 21 |
Ali | 20 |
4- build hibernate configuration file ( this file define you database engine ,your password , and driver that’s essentially to connect to mysql or other database engines) . configuration file is an xml file .it is name ( hibernate.cfg.xml ) . place in default package .
right-click on default -package choose other
Then click finish
- Now we will explain hibernate configuration file
5 – build java bean class . this class have fields that we name it in our database
Every table in our database have one bean implements database fields place it in default package .
6- now build xml file have name like the java bean class name (in our project Main ) this file named with hibernate mapping file . we use this file to assign each attribute in our bean class to each field in our database.(hint :each table in our database has java bean class and mapping file to connect each).
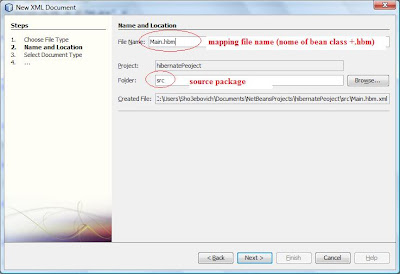
- Now to begin our first project we must do the main class we will name it (insert )
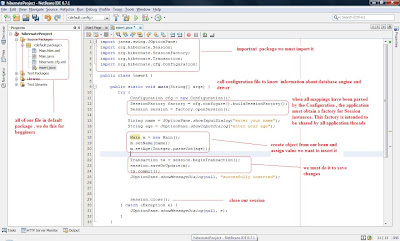
When you run the project
Download Source Code:
Thanks for your time and consideration and hope you enjoyed this tutorial.
Disclaimer:
This Tutorial written by Ahmed Shoeib.So Many thanks for his support, we hope to enjoy his awesome posts.


16 comments: on "How to use Hibernate and MySQL Server in NetBeans IDE,The easy way."
Good tutorial Shoeib, thanks Islam for your useful blog :)
@Ahmed
Thanks for your support :)
there is anothor way to connect without using libraries in netbeans
by connecting database in ODBC and connect java program with ODBC
search the connector on internet
thank you
@Ahmed
Thanks man for your great comment, yeah this is very good and easy way to connect to MySQL Server, but it have one big draw back as it work only on MS Windows platforms.
Anyway, this is good way if you target MS Windows platforms and if there is a chance, we may post more about that.
@daoud
thanks for your comment
@anas
thanks for this idea
متشكرين على معلوماتك القيمه يا بشمهندس احمد
@abden
you are welcome
مشكوووووووووووووووووووووووووووووووووووووووووووووووووووووووووووور
Very good topic islam and easy to use for any one
thank you Islam
وربنا يكرمك ان شاء يارب
thanks ibrahim for your comment
blog aktar men ra2e3 wallahi !!
rabbena yekremak !!
i'll be following your blog, post by post.
Thanks and Gazak Allah 7'ayarn !!
Thanks for your support and wait us soon isA
Nice tutorial, but this is the old way how to use hibernate, easer way of is follow convention over configuration princip. You don't need to declare every property to be persistent.
Anonymous
you are right , but it's still an option to do it .
Thanks for your care and comment @.
good tutorial ta raees , i hope to continue with my best wishes
Thanks
It is useful for beginners
But i am getting the following error:
org.hibernate.MappingException:entity class not found:Main
Post a Comment